

What is photo compositing?
Photo compositing is the art of blending multiple separate images or graphic elements into a single, cohesive final image. Those elements might come from different times, different locations, or even different realities entirely. The goal is a unified picture that looks intentional and, depending on the project, either convincingly real or deliberately surreal.
A quick distinction worth making: photo compositing is not the same as photo composition. Composition refers to how you arrange elements within a single frame when you shoot. Compositing happens after the shutter clicks, in post-production, where separate images are assembled using software.
The core building blocks of any composite are:
- Layers: Each image or element lives on its own layer, keeping edits independent and reversible.
- Layer masks: These control which parts of a layer are visible without permanently erasing pixels, preserving every edit as non-destructive.
- Blending modes: Settings like Multiply, Overlay, and Soft Light determine how layers interact with each other visually.
- Color and tone adjustments: Tools like Curves, Levels, and Camera Raw bring all the elements into a shared color and lighting space.
Adobe Photoshop is the dominant software for this work, though the underlying principles apply across most professional image editing applications. The technique spans everything from subtle retouching to full-scale fantastical scenes that could never exist in a single photograph.
Why photographers and artists use compositing

Compositing solves real problems and opens creative doors that a single camera exposure simply cannot. Both motivations are valid, and most professional work involves a mix of the two.
On the practical side, compositing overcomes hardware and environmental limits that even the best camera gear cannot fully address:
- Focus stacking: Merging multiple shots taken at different focus distances to achieve a depth of field impossible in one exposure.
- HDR blending: Combining bracketed exposures to capture detail in both highlights and shadows simultaneously.
- Background replacement: Swapping a distracting or unusable background for one that serves the image better.
- Distraction removal: Eliminating unwanted objects, people, or blemishes that would otherwise require a reshoot.
On the creative side, compositing is what makes photorealistic impossible scenes achievable. Advertising campaigns regularly place products in environments that were never photographed together. Fashion editorials build worlds that exist only in the final image. Conceptual photographers like Fares Micue construct entire visual narratives from carefully planned, separately captured elements. The technique is equally at home solving a technical problem and expressing a purely imaginative vision.
How to plan and shoot for a strong composite
The most common mistake in compositing is treating the camera as a rough-capture device and expecting Photoshop to fix everything later. Post-processing cannot rescue poor source images, and the more you rely on software to compensate for a weak shoot, the more hours you spend on corrections that planning would have prevented.
Before you pick up a camera, sketch or visualize the final image. Know which elements you need, where the light source will be, and how each piece will fit spatially with the others. This pre-visualization step is what separates a composite that looks assembled from one that looks captured.
During the shoot itself, keep these principles in mind:
- Use a tripod. Consistent perspective across all source shots dramatically reduces alignment work in post-production.
- Match your light. Shoot all elements under the same light direction and color temperature, or note the differences precisely so you can correct them later.
- Shoot more than you think you need. Extra angles, extra takes, and extra background plates give you options when editing reveals a gap.
- Mind your color temperature. Mixing a tungsten-lit subject against a daylight background is a common tell that a composite is artificial.
- Capture clean backgrounds. A shot of the background plate without your subject in frame makes masking far cleaner.
Pro Tip: Shoot your background plate first, then bring your subject into the same space and light. Matching the environment to the subject is almost always easier than the reverse.
Editing techniques for compositing in Photoshop
Once your source images are in Photoshop, the assembly process follows a clear progression from rough placement to refined integration. The tools below each serve a distinct role in that workflow.
| Photoshop Tool | Function in Compositing |
|---|---|
| Layers | Stack and organize every image element independently |
| Layer Mask | Hide or reveal parts of a layer without destroying pixels |
| Select and Mask workspace | Refine complex selections like hair, fur, or foliage |
| Curves | Adjust brightness, contrast, and color channel by channel |
| Camera Raw | Match color temperature and exposure across source images |
| Blending Modes | Control how layers interact (Multiply, Overlay, Soft Light) |
| Clone Stamp / Healing Brush | Remove distractions and artifacts after elements are merged |
| Warp / Transform | Adjust perspective and fit elements to the scene geometry |
Layer masks for non-destructive editing are the foundation of a professional workflow. Painting on a mask with black hides pixels; painting with white reveals them. Nothing is permanently deleted, so you can refine edges at any stage without starting over.
Edge refinement is where many composites succeed or fail. The Select and Mask workspace handles complex selections like hair or foliage that a simple lasso cannot capture cleanly. Getting those edges right is what separates a composite that reads as real from one that looks pasted together.
Blending modes like Multiply, Overlay, and Soft Light control how a layer's pixels interact with the layers beneath it. Multiply darkens, which works well for shadows. Overlay increases contrast and saturation. Soft Light adds a gentle glow without blowing out highlights. Choosing the right mode for each element is part technical decision, part artistic judgment.
After the main elements are merged, a cleaning phase using Clone Stamp or Healing Brush removes any remaining clutter, seam artifacts, or inconsistencies. Skipping this step is what makes otherwise strong composites look unfinished.
Pro Tip: Work with Adjustment Layers rather than applying Curves or color corrections directly to image layers. Adjustment Layers stay editable and can be clipped to affect only the layer below, giving you precise, reversible control over each element's tone.
What a real compositing workflow looks like
Conceptual photographer Fares Micue, whose work Adobe has featured as a reference for composite photography, approaches each project by building the image in her mind before she ever shoots. She identifies every element the scene requires, plans the lighting for each, and captures them with the final composite already mapped out. The editing phase then becomes an act of assembly rather than improvisation.
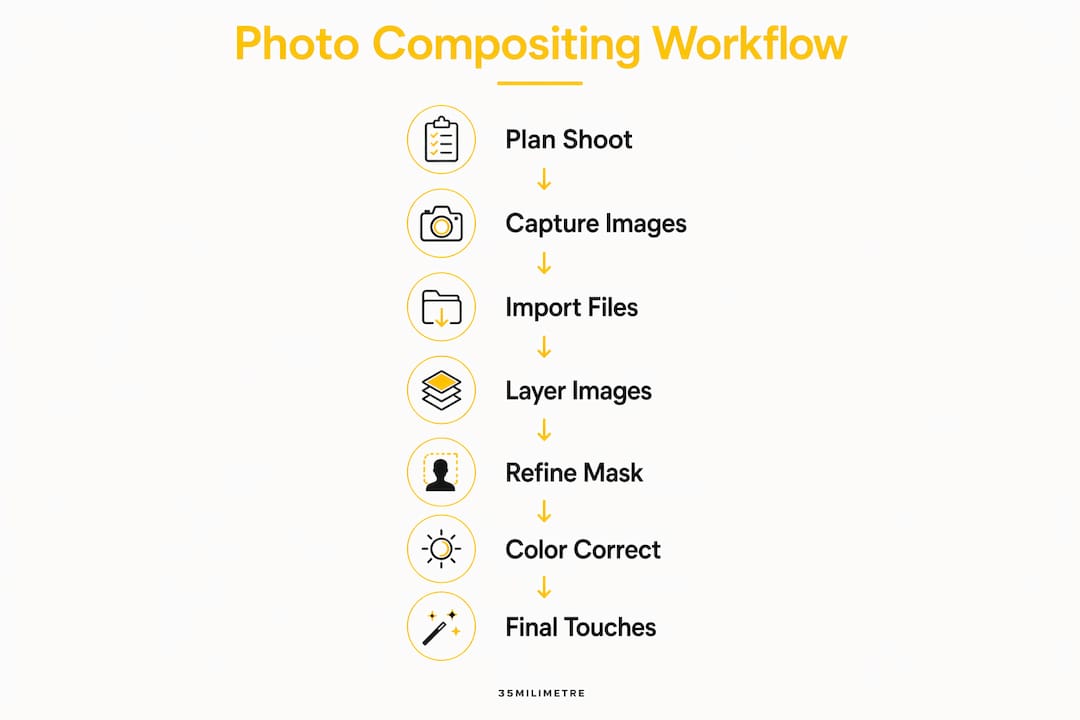
A typical project in her workflow moves through these stages:
- Pre-visualization: Sketch or mood-board the final image, noting light direction, color palette, and spatial relationships.
- Shooting: Capture each element with matching light and perspective, using a tripod for consistency.
- Rough assembly: Place all layers in Photoshop and establish the basic composition without worrying about edges or color yet.
- Masking: Refine each element's edges using layer masks and the Select and Mask workspace.
- Color harmonization: Use Curves and Camera Raw to bring all elements into a shared tonal and color space.
- Cleaning: Remove artifacts, seams, and distractions with Clone Stamp and Healing Brush.
- Final grading: Apply a unified color grade across the whole image to tie everything together.
The time investment in a high-end composite is real. A single finished image can represent many hours of work across both the shoot and the editing suite. That investment is what produces imagery that reads as a single, unified photograph rather than a collection of parts.
How 35milimetre approaches professional compositing
At 35milimetre, compositing is not a post-shoot fix. It is a discipline that begins at the concept stage and runs through every decision made on set and in the editing suite. The studio's two-decade track record across technology and automotive campaigns reflects that approach: every element is captured with the final image already in mind.
The studio's workflow relies on advanced masking techniques, including the Select and Mask workspace for complex edges, combined with meticulous lighting consistency checks before any element is finalized. Color grading is applied as a final unifying pass, not as a corrective measure for mismatched source images.
35milimetre also works at the intersection of photography and 3D integration, combining CGI elements with photographic backgrounds to produce visuals that neither medium could achieve alone. This capability is particularly relevant for product campaigns where a physical object needs to exist in an environment that was never built or photographed.
Pro Tip: When matching a CGI element to a photographic background, render the 3D asset under an HDRI captured at the actual shoot location. The shared lighting environment is what makes the integration read as real.
For photographers and brands looking to understand what professional post-production compositing can deliver, 35milimetre's portfolio demonstrates the range from subtle retouching to full-scale conceptual builds.

How compositing evolved from darkrooms to digital
Photo compositing is older than most people assume. The technique predates digital software by more than a century, tracing back to the trick films of Georges Méliès in the late 19th century, where multiple exposures and in-camera techniques created visual illusions that audiences had never seen. Early photographers used double exposures and hand-cut masks in the darkroom to combine images long before any software existed.
Physical compositing techniques like glass paintings and partial scale models were standard practice in film production for decades. A glass painting placed in front of a camera could extend a set or add an environment that would have been impossible or prohibitively expensive to build. Partial models worked similarly, completing a structure in the frame that only existed in miniature on set.
Traditional matting, the process of printing two film elements onto a single duplicate strip, was the dominant method through much of the 20th century. It required precise registration across five separate film strips, and even small drift between them produced visible halos and artifacts in the final image. The process was painstaking and the results were never perfect.
Digital compositing replaced traditional matting for two decisive reasons. First, digital alignment is exact down to the single pixel, eliminating the registration drift that plagued film-based methods. Second, digital images can be copied without any loss of quality, whereas each generation of film duplication degraded the image. The shift to digital also introduced alpha blending, the mathematical operation at the core of modern compositing, where an opacity value controls exactly how much of each input pixel contributes to the final output.
Today, digital compositing in film and VFX routinely produces set extensions, creature integrations, and environmental replacements that audiences accept as photographed reality. The same principles that govern a Hollywood VFX pipeline apply directly to still photography compositing in Photoshop. The tools are different in scale, but the logic of matching light, perspective, and color across elements is identical.
The visual storytelling potential that compositing unlocks has also made it central to commercial photography, where a single image often needs to carry the weight of an entire campaign. Understanding that history makes it easier to appreciate why the craft demands both technical rigor and artistic judgment in equal measure.
Key Takeaways
Photo compositing combines multiple images into one unified visual, and success depends equally on disciplined shooting and precise editing in Photoshop.
| Point | Details |
|---|---|
| Definition | Photo compositing blends separate images or elements into one cohesive final image, often creating scenes impossible to capture in a single shot. |
| Planning is primary | Shooting with a clear vision and matched lighting reduces editing time and produces stronger source material. |
| Core Photoshop tools | Layers, layer masks, Select and Mask, Curves, and blending modes are the foundation of every professional composite workflow. |
| Visual integrity | Matching light direction, color temperature, and perspective across all elements is what makes a composite believable. |
| Long history | Compositing predates digital software, evolving from darkroom double exposures and physical glass paintings to pixel-precise digital methods. |