

Packaging visualization is defined as the process of creating photorealistic 3D digital images of product packaging to preview and refine designs before physical production begins. For marketing professionals and brand managers, this process replaces flat dieline artwork with shelf-ready renders that show exactly how a package will look in a retail environment, in a consumer's hand, or in a campaign image. The industry term most commonly used is "3D packaging rendering," and understanding what is packaging visualization means understanding how modern brands approve, iterate, and market products faster and with far less risk. Techniques like compositing, texture mapping, and photorealistic lighting sit at the core of every effective packaging visualization workflow.
What are the key steps in the packaging visualization process?
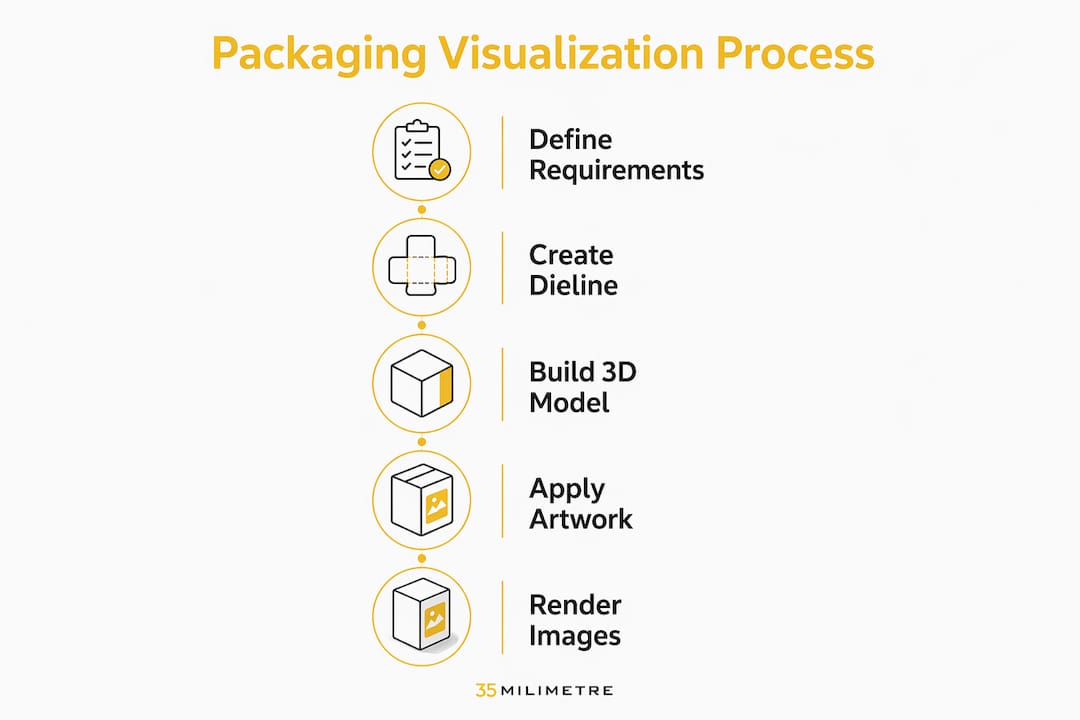
The standard packaging visualization workflow follows five defined stages, each building on the last to produce renders that are accurate enough for production approval and compelling enough for marketing use.
Step 1: Define product requirements and dimensions. This stage establishes the physical parameters of the packaging. You document substrate type, dimensions, weight limits, and any structural constraints before any design work begins. Getting this right prevents expensive rework later.
Step 2: Create the structural design and dieline. A dieline is the flat, unfolded template that shows every panel, fold, and cut of the packaging. 3D packaging design integrates structural engineering with visual design at this stage, simulating folding mechanics and opening behavior digitally before a single physical sample is made. This reduces structural errors and improves the final product's fit and performance.
Step 3: Build the 3D model. A 3D artist constructs a digital model of the packaging using the dieline as a blueprint. The model captures every surface, edge, and curve of the physical form. Accuracy here determines whether the final render looks like the real product or like a generic approximation.

Step 4: Apply artwork, textures, and materials. The 2D graphic design is mapped onto the 3D model. Material properties are applied at this stage: matte finishes, gloss coatings, foil embossing, soft-touch textures, and transparent windows all behave differently under light. Replicating these material properties accurately is what separates a convincing render from a flat mockup.
Step 5: Render photorealistic images. The final stage produces the actual images. Lighting, shadows, reflections, and environmental context are all set here. The output can include isolated packshots, beauty shots, or full shelf scenes depending on the intended use.
Pro Tip: Run iterative review cycles after Step 4, before committing to final rendering. Sharing the textured model with branding, legal, and commercial teams at this stage catches label errors and color discrepancies without the cost of re-rendering full scenes.
Why is packaging visualization important for brand marketing?
Packaging visualization bridges the gap between a flat 2D dieline and the three-dimensional shelf experience that shoppers actually encounter. A dieline tells you what is printed. A 3D render tells you what is seen. Those two things are not the same, and the difference matters enormously for brand managers evaluating shelf impact.
Stakeholders need shelf-rendered views to evaluate design impact and shopper visibility in ways that 2D artwork simply cannot communicate. A color that reads beautifully on a flat proof can disappear when surrounded by competing products on a crowded shelf. A structural detail that looks elegant in isolation can read as clutter at retail scale.
The benefits of visualization extend well beyond internal review:
- Shelf impact assessment. Renders placed in a simulated shelf context let you evaluate how your packaging competes visually against adjacent products, before spending on production.
- In-hand consumer preview. Lifestyle renders showing a package held or used give marketing teams a realistic sense of the consumer touchpoint and unboxing experience.
- Trade marketing and buyer approval. Retail buyers increasingly expect to see photorealistic renders during range review meetings, not just printed samples or flat artwork files.
- Campaign-ready imagery. High-quality renders produced during the visualization process can go directly into advertising, social media, and e-commerce listings, reducing the need for a separate product photography shoot.
- Unboxing experience planning. Unboxing video content has become a significant consumer engagement channel, and visualization helps brands plan the unboxing sequence before the packaging is even manufactured.
"Brands adopt packaging visualization mainly to provide an in-context shelf perspective beyond traditional dielines, enabling better trade marketing decisions and faster buyer approvals. The render is not just a preview. It is a communication tool that aligns every stakeholder around the same visual reality."
What types of packaging can be visualized?
3D packaging visualization supports a wide range of formats, including bottles, cartons, pouches, cans, jars, tubes, and flow-wrap bags. Each format requires an accurate 3D model built to the exact structural specifications of the physical packaging. The format determines the complexity of the modeling work and the material properties that need to be simulated.
The output format of the visualization also varies depending on its intended use. Three primary render types serve different marketing and approval purposes:
| Render Type | Description | Primary Use |
|---|---|---|
| Packshot | Clean, isolated image of the package on a white or neutral background | E-commerce listings, press kits, retail catalogs |
| Beauty shot | Styled image with props, lighting, and context to enhance appeal | Advertising, social media, brand campaigns |
| In-context shelf shot | Package rendered within a simulated retail shelf environment | Trade presentations, buyer approvals, shelf planning |
| In-hand lifestyle render | Package shown being held or used by a person | Consumer engagement content, unboxing previews |
| Colorway comparison | Multiple design variants rendered side by side | Internal design review, range planning |
Packshots are the workhorse of e-commerce and retail catalogs. They communicate the product clearly without distraction. Beauty shots serve brand campaigns where emotional resonance matters more than clinical accuracy. Shelf shots are the format most directly tied to trade marketing, giving retail buyers and brand managers a realistic view of how the product will compete at point of sale. For product launches and campaigns, having all three render types ready before production begins gives marketing teams a significant head start.
How to apply packaging visualization in marketing and approval workflows
The real value of packaging visualization shows up when renders are integrated into the workflows where decisions actually get made. Producing a beautiful render and filing it away misses the point entirely.
3D packaging renders replace early physical prototypes, offering faster approvals and better collaboration among designers, clients, and production teams. Sharing the same digital model across departments eliminates the version-control problems that come with physical samples circulating through multiple offices.
Effective integration looks like this:
- Internal alignment. Share renders with branding, legal, and commercial teams simultaneously. Each team reviews the same visual reference, which reduces the back-and-forth caused by mismatched interpretations of flat artwork.
- Design decision support. Present colorway comparison renders side by side during range planning meetings. Seeing three label variants rendered on the same bottle form makes the decision faster and more confident than reviewing flat files.
- Retail buyer presentations. Packaging display visualization tools enable brand owners and marketing teams to review displays online, reducing approval uncertainty and the number of prepress corrections needed before print.
- Client pitches. Ad agencies and brand consultancies use photorealistic renders in pitch decks to show clients exactly what the finished product will look like. This builds confidence and accelerates sign-off.
- Media and advertising content. Renders produced for approval can be repurposed directly in digital advertising, reducing the cost and timeline of a separate product photography session.
Pro Tip: When presenting renders to retail buyers, always include a shelf context shot alongside the isolated packshot. Buyers think in terms of shelf sets, not individual products. Showing your packaging in a competitive shelf context answers their primary question before they ask it.
For ad agency visual workflows, integrating packaging renders early in the production timeline prevents the bottleneck that occurs when final photography is delayed by late-stage design changes.
Key Takeaways
Packaging visualization is the most direct way to align marketing, production, and retail stakeholders around a shared visual reality before any physical packaging is manufactured.
| Point | Details |
|---|---|
| Definition is specific | Packaging visualization means creating photorealistic 3D renders of packaging, not just digital mockups or flat artwork previews. |
| Five-step workflow | The process runs from product requirements through dieline creation, 3D modeling, texture mapping, and final rendering. |
| Shelf context is non-negotiable | Renders must simulate real retail environments to give accurate readings of shelf impact and competitive visibility. |
| Multiple render types serve different needs | Packshots, beauty shots, and shelf shots each serve distinct marketing, approval, and trade purposes. |
| Renders replace physical prototypes | Digital renders accelerate approvals and reduce the cost of early-stage physical sampling. |
What we've learned about render quality after two decades of production work
The most common mistake we see in packaging visualization is what we call "studio trap." A render is lit beautifully, the materials look perfect, and the brand team approves it with confidence. Then the product hits the shelf and nobody can find it. The render was never wrong. It was just never tested against the right conditions.
A design that appears striking in isolated lighting can disappear next to bolder competitor packaging on a real shelf. This is not a failure of the visualization process. It is a failure to use the process correctly. Shelf context renders exist precisely to prevent this outcome, and they are still underused.
The second issue we encounter regularly is material accuracy. Brands approve renders showing a premium soft-touch matte finish, then discover during prepress that their chosen substrate and print process cannot reproduce it at the approved cost. The fix is straightforward: build your material library from actual production-achievable finishes, not from what looks best in a render. Visualization should reflect production reality, not exceed it.
The third observation is about iteration speed. Teams that treat the first render as a near-final output consistently produce worse results than teams that run two or three fast review cycles on the textured model before committing to full rendering. The cost of an additional review cycle is small. The cost of re-rendering a full shelf scene after a label error is discovered is not.
— 35mm
How 35milimetre's post-production services refine your packaging visuals
Producing a technically accurate 3D render is only part of the work. The final image that appears in a campaign, a retail presentation, or an e-commerce listing needs the kind of post-production refinement that separates a good visual from one that genuinely sells.
35milimetre brings over two decades of compositing, retouching, and color grading experience to packaging imagery. The studio's team works directly with marketing professionals and brand managers to refine renders into campaign-ready visuals that hold up across every format, from full-page print to mobile product listings. Whether you need a packshot corrected for color accuracy, a beauty shot composited into a lifestyle scene, or a shelf render refined for a trade presentation, 35milimetre handles the post-production work that makes the difference between a render and a finished asset. You can review the full range of packaging design guidance on the 35milimetre blog to understand how visualization fits into the broader design process.
FAQ
What is packaging visualization in simple terms?
Packaging visualization is the process of creating photorealistic 3D digital images of product packaging before it is physically manufactured. It allows brand managers and marketing teams to preview, review, and approve designs using renders instead of physical prototypes.
What are the main steps in the packaging visualization process?
The process follows five steps: defining product requirements, creating the structural dieline, building a 3D model, applying artwork and material textures, and rendering the final photorealistic images for approval and marketing use.
Why do brands use packaging visualization instead of physical prototypes?
3D renders replace physical prototypes because they are faster to produce, easier to share across teams, and less expensive to revise. They also enable shelf context testing that physical samples cannot replicate without a full retail mock-up.
What is the difference between a packshot and a beauty shot?
A packshot is a clean, isolated image of the packaging on a neutral background, used primarily for e-commerce and catalogs. A beauty shot is a styled, context-rich image designed to communicate brand appeal in advertising and social media.
How does packaging visualization support retail buyer approval?
Shelf context renders show retail buyers exactly how a product will appear within a competitive shelf set. Visualization tools enable online review of packaging displays, reducing approval uncertainty and the number of corrections needed before production begins.