AI image enhancement is the process of improving photo quality using artificial intelligence models that upscale resolution, reduce noise, correct color, and restore detail while preserving natural appearance. For digital marketers, graphic designers, and content creators, knowing how to enhance images with AI separates polished, brand-ready visuals from assets that quietly undermine credibility. Tools like Adobe Firefly, Topaz Labs, and Magnific have matured significantly in 2026, offering workflows precise enough for commercial production. The difference between a mediocre result and a professional one almost always comes down to preparation, model selection, and how carefully you review the output.
How to enhance images with AI: starting with the right assessment
Before you touch a single AI slider, you need to know exactly what is wrong with your image. AI image enhancement typically addresses four degradation types: low resolution, digital noise, motion or focus blur, and compression artifacts such as blocking and color banding. Each requires a different tool and a different workflow. Stacking enhancements without identifying the primary problem is the fastest way to produce an image that looks processed rather than restored.
Evaluating image quality before enhancement is critical. Clean but low-resolution images respond best to AI upscaling. Images with heavy noise or blur require denoising or deblurring first, because upscaling amplifies existing defects rather than correcting them. Compression artifacts, common in JPEGs pulled from websites or social media, need artifact removal before any resolution work begins.
Practical pre-processing steps make a measurable difference:
- Crop tightly to the subject before processing. Unnecessary background increases file size and can confuse AI models trained on subject-centered compositions.
- Remove overlays, watermarks, or text layers before enhancement. AI models frequently distort embedded text, and cleaning the image first avoids that problem entirely.
- Correct perspective and straighten horizons in Photoshop or Lightroom before running AI enhancement. Geometric corrections applied after upscaling can introduce resampling artifacts.
- Export source files as 16-bit TIFF or PNG rather than JPEG. This preserves color depth and prevents compression artifacts from compounding during processing.
Pro Tip: Check your image's color profile before uploading to any AI tool. Many platforms default to sRGB processing. If your file is in Adobe RGB or ProPhoto RGB, convert it to sRGB first to avoid unexpected color shifts in the output.
For e-commerce product images, this assessment step is especially important. A product shot with soft focus and JPEG compression needs artifact removal and deblurring before upscaling, not a single "enhance" button press.
What AI enhancement mode and settings should you use?
Choosing the right enhancement mode is more consequential than most guides acknowledge. Categorizing the degradation type rather than applying generic settings produces more natural reconstruction. This is the core principle behind every professional AI enhancement workflow.

Magnific offers a clear illustration of this distinction. Its two upscaling modes serve fundamentally different purposes. Precision mode is designed for faithful photographic upscaling, preserving the original image's texture and detail without reinterpretation. Creative mode reimagines texture and surface detail, which suits artistic or stylized work but is inappropriate for product photography or brand imagery where accuracy is non-negotiable. Choosing the wrong mode on a product render produces results that look plausible at a glance but fail under scrutiny.
| Mode | Best for | Risk if misapplied |
|---|---|---|
| Precision (Magnific) | Product photos, portraits, brand assets | Minimal. Faithful reproduction. |
| Creative (Magnific) | Concept art, stylized visuals, textures | Texture hallucination on real subjects |
| Topaz Denoise Max | High-ISO noise, studio shots | Over-smoothing fine fabric or hair detail |
| Topaz Super Focus 3 | Motion blur, soft focus recovery | Edge halos if strength is set too high |
| Adobe Firefly Precision Flow | Targeted regional edits, compositing | Inconsistent lighting if region selection is imprecise |
Topaz Labs offers specialized models including Wonder 3, Denoise Max, Super Focus 3, and High Fidelity 3, each targeting a specific degradation type. This specialization matters. A single generalist pass rarely outperforms a targeted model applied to the correct problem.
Scale factor is the other critical variable. Start at 2x upscaling rather than 4x. A 2x pass reviewed and approved at 100% zoom is always safer than a single 4x pass that introduces artifacts you only notice after export. For most commercial applications, 2x from a well-prepared source file produces output that meets print and large-format display requirements.
Pro Tip: When using Adobe Firefly for targeted edits, use the AI Markup feature to annotate specific regions with text prompts. This region-specific control reduces the number of iterations needed and keeps surrounding areas intact, which is particularly valuable when retouching product details within a complex composite.
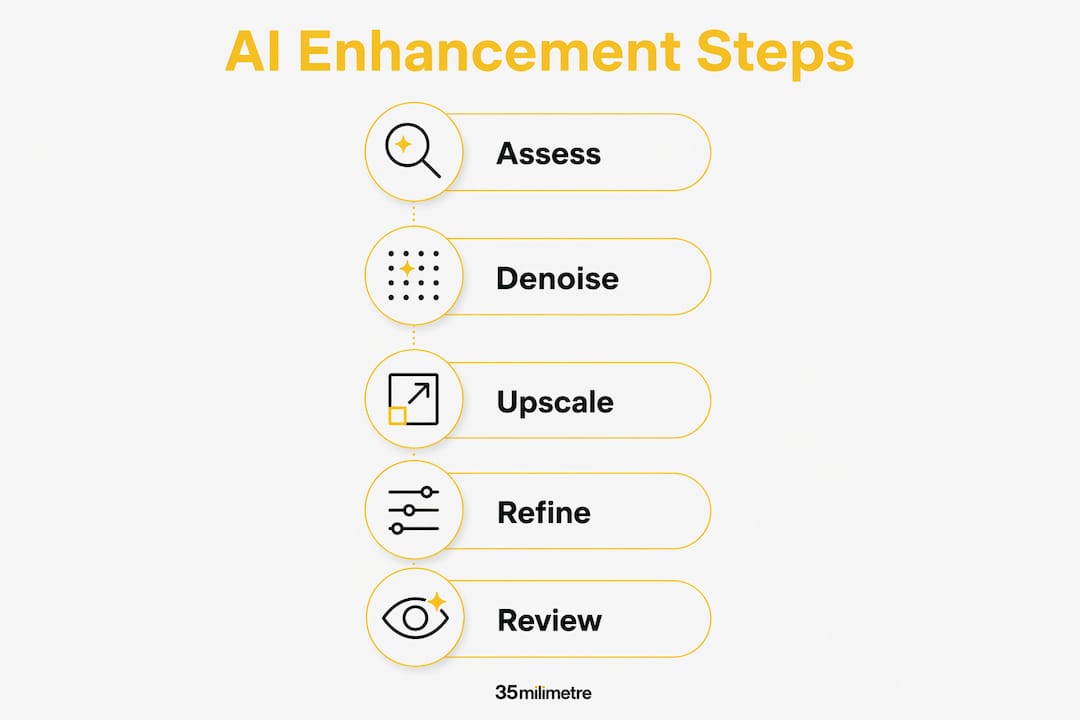
How to execute AI enhancement step by step
The correct sequence for AI-based image quality improvement is: artifact removal and denoising first, then sharpening or deblurring, then upscaling. Reversing this order amplifies every defect the AI encounters. Denoising and artifact removal before upscaling prevents defects from compounding, which is the single most common mistake in amateur AI enhancement workflows.
Here is the production workflow 35milimetre follows for commercial retouching projects:
- Run artifact removal or denoising. Use Topaz Denoise Max or an equivalent model at moderate strength. Avoid maximum settings on the first pass. The goal is to reduce noise without destroying fine texture in fabric, hair, or product surfaces.
- Apply sharpening or focus recovery if needed. Topaz Super Focus 3 handles motion blur and soft focus well. Set strength conservatively and preview at 100% before committing.
- Upscale at 2x. Use Magnific Precision mode for photographic content or Topaz High Fidelity 3 for images requiring faithful detail reproduction. Review the output at full resolution before proceeding.
- Apply targeted regional edits. Adobe Firefly's AI Markup allows you to annotate specific areas with text instructions, which is useful for correcting localized issues like a soft background edge or an overexposed highlight region.
- Review at 100% zoom. Check edges, text elements, logos, and high-contrast transitions for halos, smearing, or hallucinated detail. Thumbnails conceal artifacts that are obvious at full size.
- Export in the correct format. For web delivery, export as PNG or high-quality JPEG. For print or further compositing, export as 16-bit TIFF.
"Two passes with moderate settings are safer than one aggressive pass in production workflows." — LTX Blog, 2026
Iterative moderate enhancement reduces synthetic artifacts and improves texture credibility compared to a single aggressive pass. This is not a conservative approach. It is the approach that consistently produces output you can actually use.
For ad agency visual workflows, building this sequence into a repeatable pipeline saves significant revision time. When every team member follows the same enhancement order, quality becomes predictable rather than variable.
Common challenges when improving photos with AI
Even experienced practitioners run into the same set of problems. Recognizing them early prevents wasted processing time and protects image quality.
Artifacts like halos, text distortion, and plasticky textures appear most often in high-contrast regions and along sharp edges after upscaling. Halos form when sharpening strength is too high relative to the image's native edge definition. The fix is to reduce sharpening strength and re-run, not to apply a second pass of a different model on top.
Text and logos are the most fragile elements in any AI enhancement workflow. Upscaling models are trained on photographic content, not typographic forms. Fine serif fonts and small-scale logos frequently distort after a 4x upscale. The practical solution is to remove text and logo layers before enhancement, then recomposite them from the original vector source afterward.
- Over-smoothing in noise reduction: Denoise models set to maximum strength eliminate fine texture along with noise. Fabric weave, skin pores, and product surface detail all suffer. Use moderate strength and compare the output against the original at 100% zoom before accepting the result.
- Repeated compression cycles: Saving a JPEG, enhancing it, and saving as JPEG again compounds compression artifacts with each cycle. Always work from the highest-quality source available and export to a lossless format until the final delivery step.
- Model stacking without purpose: Running three different AI tools sequentially without a clear reason for each pass degrades texture and introduces inconsistencies. Single primary model selection is more important than applying more AI passes.
Pro Tip: If you are working with a product image that has both a soft-focus background and a sharp foreground subject, process the foreground and background as separate layers. Apply different enhancement strengths to each, then recomposite. This preserves the intentional depth-of-field separation that a uniform enhancement pass would flatten.
The underlying principle across all these challenges is the same. More AI processing is not better processing. Knowing when to stop is as important as knowing which tool to use.
Key takeaways
AI image enhancement produces professional results when you identify the specific degradation type first and apply targeted tools in the correct sequence, rather than stacking generic passes.
| Point | Details |
|---|---|
| Assess before processing | Identify whether the primary issue is noise, blur, low resolution, or compression artifacts before selecting any tool. |
| Match mode to content type | Use Precision mode for product and brand photography; reserve Creative mode for stylized or artistic work only. |
| Sequence matters | Always denoise and remove artifacts before upscaling to prevent defects from amplifying. |
| Review at 100% zoom | Thumbnail previews hide halos, text distortion, and edge smearing that are visible at full resolution. |
| Moderate passes outperform aggressive ones | Two controlled enhancement passes consistently produce better texture and fewer artifacts than one maximum-strength pass. |
What two decades of post-production taught us about AI enhancement
The tools have changed dramatically. The discipline required to use them well has not.
When 35milimetre started integrating AI enhancement into commercial workflows, the temptation was to treat it as a one-click fix. It is not. The studios and freelancers who get the best results from tools like Topaz Labs and Adobe Firefly are the ones who approach AI the same way they approach manual retouching: with a clear diagnosis of the problem, a deliberate sequence of corrections, and a willingness to reject output that does not meet the standard.
The most underrated skill in AI-based image quality improvement is knowing when the result is good enough and when it is not. Quick previews inside enhancement tools are almost always flattering. The artifact you missed in the preview becomes obvious when the image is printed at A2 or displayed on a 4K monitor. Pixel-level review at 100% zoom is not optional for commercial work. It is the step that separates professional output from output that merely looks professional at small sizes.
We are also watching the research closely. The AAAI 2026 paper "Diffusion Once and Done" points toward one-step diffusion restoration becoming a practical production tool within the next few years. For high-volume workflows, that shift will matter enormously. But even when restoration becomes faster and cheaper computationally, the judgment calls about which model to use and how to review the output will still require a trained eye.
The role of AI in creative studios in 2026 is not to replace that judgment. It is to give skilled practitioners better instruments to act on it.
— 35milimetre
Professional AI enhancement for brand-critical imagery
When the image carries your brand, the margin for error is zero. At 35milimetre, we combine AI enhancement workflows with two decades of hands-on compositing and retouching experience to deliver visuals that hold up under every condition: print, digital, large-format, and broadcast. Whether you are working with archival photography that needs resolution recovery, product imagery that requires precise detail restoration, or campaign assets that need color grading and AI-based refinement, our post-production services are built for exactly that level of demand. Reach out to discuss your project and see what a professional enhancement workflow produces compared to a generic tool pass.
FAQ
What does AI image enhancement actually do?
AI image enhancement uses trained machine learning models to upscale resolution, reduce noise, correct color, and restore fine detail in photographs. The process preserves natural appearance by reconstructing image data rather than simply interpolating pixels.
Which AI tool is best for upscaling product photos?
Magnific's Precision mode and Topaz High Fidelity 3 are both well-suited for product photography where faithful detail reproduction is required. Precision mode is recommended when accuracy to the original is non-negotiable.
Should I denoise before or after upscaling?
Always denoise and remove compression artifacts before upscaling. Upscaling amplifies existing defects, so cleaning the image first produces significantly better results with fewer artifacts in the final output.
How do I avoid halos and plasticky textures after AI upscaling?
Start with moderate enhancement strength rather than maximum settings, and review the output at 100% zoom before accepting it. Halos typically appear when sharpening strength exceeds what the image's native edge definition can support.
Can AI enhancement fix blurry or out-of-focus images?
AI tools like Topaz Super Focus 3 can recover a meaningful amount of detail from soft-focus or motion-blurred images, but results depend heavily on the degree of blur. Severe out-of-focus images with no recoverable edge data will not produce sharp output regardless of the tool used.