
Packaging design is a commercial system that links brand identity, logistics, and customer emotion into a single physical object. Knowing how to design packaging well means balancing structure, materials, graphics, and manufacturability so that every element works together. A box that looks stunning on screen but falls apart on a production line is not finished work. The best packaging passes the 3-second read test, communicates value from one meter away, and survives a supply chain without losing its visual integrity. Tools like Adobe Illustrator and structured dielines are the foundation of that process.
How to design packaging: start with a solid brief
The packaging design process begins before a single pixel is placed. You need a complete product brief that defines dimensions, weight, fragility, and the retail environment where the product will live. A cosmetics brand selling through Sephora has different structural requirements than a direct-to-consumer electronics brand shipping through FedEx. Getting these details wrong at the start costs far more to fix later.
Your brief should answer four categories of questions. First, product specifics: exact dimensions, components, and any regulatory labeling requirements. Second, brand identity: approved color values, typography, logo files in vector format, and tone of voice. Third, logistics: shipping method, stacking requirements, and whether the product needs to survive international transit. Fourth, production constraints: print budget, quantity, and deadline.
On the tools side, Adobe Illustrator is the industry standard for packaging artwork because it handles vector graphics and dieline layers natively. Raster images embedded in your file must be at least 300 ppi at final print size to avoid soft or pixelated output. All colors should be set to CMYK from the start, not converted at the end, since RGB-to-CMYK shifts can throw brand colors off significantly.
Pro Tip: Request the manufacturer's official dieline file before you open a design document. Placing artwork on an unofficial or estimated dieline is one of the most common causes of reprints.
The structural dieline is not just a template. It tells you where folds, glue tabs, and perforations sit so you never accidentally place a logo or key text over a crease. Early dieline access prevents layout errors that only become visible after the box is assembled.
How do you choose the right structure and materials?
Packaging design as a system requires that structure and materials be chosen before graphic design begins, not after. The structure determines the unboxing experience, the protection level, and the assembly cost. The material determines durability, print quality, and sustainability story.
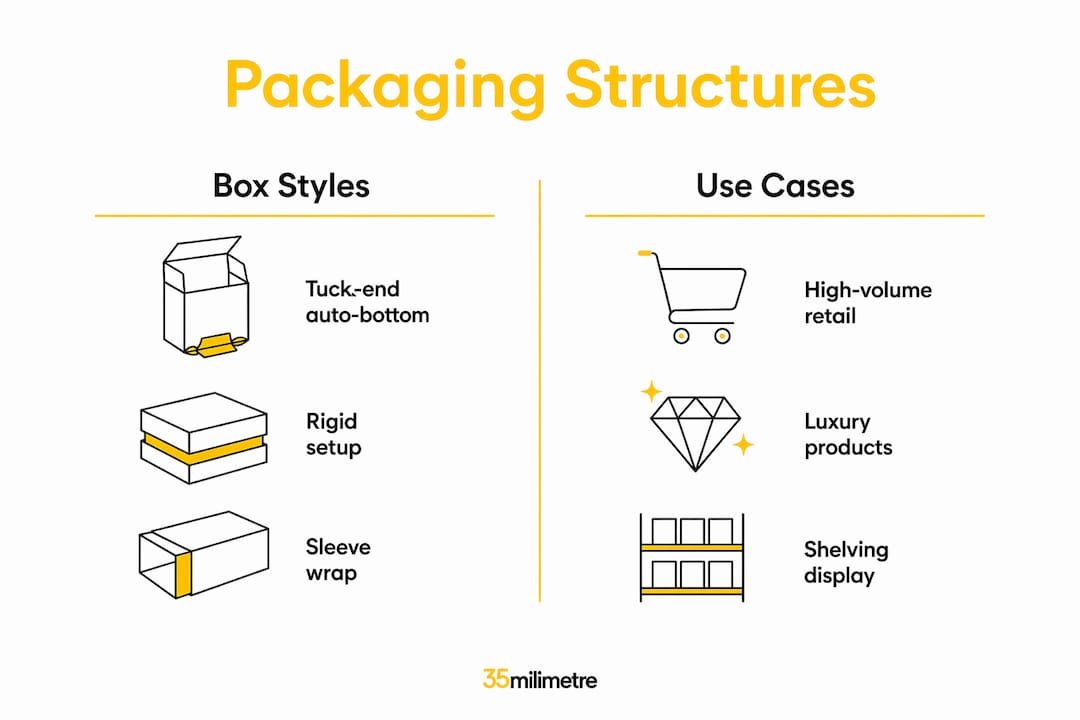
Common box styles each carry a different user experience. A tuck-end auto-bottom box assembles fast and suits retail shelf display. A rigid setup box signals premium positioning and is common in luxury cosmetics and electronics. A mailer box with a magnetic closure creates a strong unboxing moment for direct-to-consumer brands. Each choice has a cost and a manufacturing complexity attached to it.
| Structure Type | Best Use Case | Key Trade-off |
|---|---|---|
| Tuck-end auto-bottom | High-volume retail | Lower cost, faster assembly |
| Rigid setup box | Luxury and premium products | Higher cost, slower production |
| Mailer box | DTC subscription and gifting | Strong brand experience, heavier weight |
| Sleeve and tray | Electronics and accessories | Clean presentation, two-part assembly |
| Folding carton | Food, pharma, and cosmetics | Lightweight, highly printable |
Material selection follows a similar logic. Corrugated board offers protection for shipping. Solid bleached sulfate (SBS) board gives a clean white surface ideal for high-resolution printing. Kraft board communicates sustainability and works well for natural or organic brands. Each substrate accepts ink differently, which is why color verification through ink drawdowns on the actual material is a non-negotiable step before mass production.
A minimum 10mm internal gap between the product and the inner walls of the packaging is the standard buffer for protection and assembly ease. This gap is not just about safety. It directly affects how quickly a packing team can load products, which scales into significant labor cost differences at volume.
Pro Tip: Ask your manufacturer for a Design for Manufacturing (DFM) review before finalizing structure. They will flag tolerance issues and assembly complications that are invisible on screen.
What are the best practices for graphic design on packaging?
Packaging elements including color, typography, imagery, structure, materials, and finish each influence buying decisions independently and build sequential impressions on the consumer. This means no single element carries the full weight of communication. Every surface works as part of a layered visual strategy.
Hierarchy is the most important graphic principle in packaging. The consumer's eye needs a clear path: brand name first, product name second, key benefit or variant third. Visual noise kills hierarchy. If every element competes for attention, nothing wins. Reduce the number of fonts to two at most, keep color fields clean, and let negative space do real work.
The 1-meter legibility standard is a practical test every designer should run before sending files to print. Stand one meter from a printed proof and check whether the product name and primary value proposition are immediately readable. If you squint, the type is too small or the contrast is too low. This test catches problems that look fine on a 27-inch monitor but fail completely on a retail shelf.
Print finishing options add a tactile dimension that photography and renders cannot fully replicate. Soft-touch lamination creates a matte, velvety feel that signals quality. Spot UV coating draws the eye to specific graphic elements. Foil stamping on a logo or wordmark communicates premium positioning instantly. Embossing adds physical depth that consumers notice when they pick up the product.
Technical file preparation follows a strict checklist before any file goes to a printer.
- All raster images must be 300 ppi at final print size, embedded not linked.
- Colors must be in CMYK with Pantone spot color callouts where brand accuracy is critical.
- Bleed must extend at least 3mm beyond the cut line on all edges.
- Safe zones must keep all critical text and logos at least 5mm inside the cut line.
- Dieline layers must be separated from artwork layers and set to overprint.
- All fonts must be converted to outlines to prevent substitution errors.
Pro Tip: Review physical proofs under D50 standard lighting, not office fluorescents. Standard office lighting distorts color perception and leads to approvals that look wrong in retail environments.
For deeper guidance on applying these graphic principles across brand touchpoints, the graphic design best practices resource from 35milimetre covers color, typography, and imagery in detail.
How do you prototype and test packaging before production?
Physical samples validate packaging design in ways that computer screens cannot. A prototype tests fit, structural strength, and closure functionality under real conditions. It also reveals assembly issues that only appear when a human hand is involved in the packing process.
The prototype stage follows a clear sequence. First, request a white or unprinted structural sample to test dimensions and product fit. Confirm the 10mm internal buffer is correct and that the closure mechanism holds under light stress. Second, request a printed color sample on the actual substrate to verify color accuracy, print quality, and finish appearance. Third, assemble the box at speed to estimate packing time and identify any friction points that would slow a production line.
| Testing Checkpoint | What It Validates | Why It Matters |
|---|---|---|
| Structural white sample | Dimensions, fit, closure | Catches sizing errors before print costs are incurred |
| Printed color proof | Color accuracy, finish quality | Confirms brand colors match approved standards |
| Assembly speed test | Labor efficiency | Identifies design features that slow packing |
| Drop and transit test | Structural integrity | Validates protection for shipping conditions |
| Compliance review | Labeling and regulatory requirements | Prevents recalls or import issues |
Ignoring tolerance and assembly time leads to labor cost increases that compound at scale. A box that takes 30 extra seconds to assemble adds up to hours of lost productivity per thousand units. Catching this at the prototype stage costs almost nothing. Catching it after a production run is expensive.
Final approval before mass production should include written sign-off on the printed color proof, confirmed unit cost from the manufacturer, and a compliance check against any applicable regulations for your market. For brands selling into the European Union or the United States, labeling requirements for food, cosmetics, and electronics are specific and non-negotiable. Build this review into your packaging design workflow as a fixed step, not an afterthought.
The ecommerce packaging design guide from 35milimetre goes deeper on how packaging decisions affect customer experience in direct-to-consumer contexts specifically.
Key takeaways
Effective packaging design requires integrating structure, materials, graphic execution, and manufacturing realities from the first brief to the final production approval.
| Point | Details |
|---|---|
| Brief before design | Define product dimensions, brand identity, logistics, and print constraints before opening any design software. |
| Structure drives experience | Choose box style and materials based on use case, cost, and the brand impression you want to create. |
| Graphic hierarchy wins | Limit fonts to two, apply the 1-meter legibility test, and let negative space carry visual weight. |
| File prep is non-negotiable | Use 300 ppi images, CMYK color, 3mm bleed, and manufacturer-supplied dielines on every project. |
| Prototype before production | Test structure, color, and assembly speed on physical samples to catch errors before mass production costs are locked in. |
What two decades of packaging work actually teaches you
The most consistent mistake we see in packaging projects is treating manufacturability as someone else's problem. Designers hand off beautiful artwork and assume the factory will figure it out. Manufacturers receive files with logos sitting directly on fold lines, colors specified in RGB, and no bleed on critical edges. The result is a reprint, a delay, or a compromised final product.
At 35milimetre, we have worked on packaging visuals for brands across technology and consumer goods, and the pattern is always the same. The projects that go smoothly are the ones where the designer or brand manager had a conversation with the manufacturer before the first concept was presented. Not after. Before. That single shift in workflow eliminates the majority of production failures we encounter.
The other thing screen-only approvals consistently miss is tactile reality. A color that looks rich and saturated on a calibrated monitor can appear flat on an uncoated kraft board. A foil element that seems subtle in a render can look garish on the physical box. Physical samples are not a luxury step for big budgets. They are the only reliable way to know what you are actually producing.
Our honest view is that the 3-second read test and the 1-meter legibility standard should be applied at the concept stage, not just before print. If a concept fails those tests as a rough mockup, it will fail them in production. Catching that early saves weeks of revision cycles and protects the brand from launching with packaging that does not perform on shelf.
Creativity and cost efficiency are not in conflict. The most cost-efficient packaging we have seen is also the most clearly designed. When hierarchy is clear, print complexity drops. When structure is chosen for the right use case, material waste decreases. Good design and good manufacturing are the same goal approached from two directions.
— 35milimetre
Bring your packaging visuals to the next level
Strong packaging design deserves equally strong visual presentation. Whether you are preparing marketing assets, product photography, or marketplace imagery, the quality of your post-production work determines how your packaging reads to consumers before they ever hold it in their hands.
35milimetre offers professional visual post-production services built specifically for brands that need their packaging to perform in commercial environments. From compositing and color grading to 3D product renders and retouching, the studio delivers marketplace-ready imagery that reflects the full quality of your packaging design. If your packaging is worth producing well, it is worth presenting well. Reach out to 35milimetre to discuss your next project.
FAQ
What is packaging design?
Packaging design is the process of creating the structure, materials, and graphic elements of a product's container to protect the product, communicate brand identity, and influence consumer purchasing decisions. It functions as a commercial system connecting logistics, brand, and customer experience.
How do i pass the 3-second read test?
The 3-second read test requires that a consumer can identify the product and its core value proposition within three seconds from one meter away. Achieve this by prioritizing hierarchy, limiting fonts, and maximizing contrast between text and background.
What file specifications does packaging artwork require?
All raster images must be at least 300 ppi at final print size, colors must be set to CMYK, and files must include a minimum 3mm bleed beyond the cut line. Use the manufacturer's official dieline and convert all fonts to outlines before submission.
Why does the 10mm internal gap matter?
A 10mm buffer between the product and inner packaging walls protects the product during transit and speeds up assembly on the production line. Tighter tolerances increase the risk of damage and slow packing times at scale.
When should i involve the manufacturer in the design process?
Involve your manufacturer before graphic design begins, not after. Obtaining the official dieline early and requesting a Design for Manufacturing review prevents layout errors, assembly problems, and costly reprints.