
Start every edit from RAW or DNG, build your retouch in PSD or PSB (or 16-bit TIFF if you're outside Photoshop), and deliver in JPEG, WebP, or AVIF depending on the platform. For archives, keep the original raw file alongside a converted DNG or a flattened TIFF. Get these four decisions right and the rest of your file formats for retouching workflow falls into place.
TL;DR:
- Shooting in RAW at 12 to 14-bit preserves maximum image data, enabling better highlight recovery and color rebuilding compared to 8-bit formats.
- Converting proprietary raw formats to DNG ensures long-term compatibility, while native RAW files are preferable for current editing.
- Use PSD for layered retouching, switching to PSB when working with very large files or complex composites exceeding PSD limits.
- Deliver final images as JPEGs for web and TIFFs for print, avoiding editing directly in lossy JPEG to prevent quality loss over multiple saves.
- Archive should include the original raw, a lossless master in DNG or TIFF, and the finished flattened file, with clear naming and stored in multiple locations.
Table of Contents
- Capture, Retouch, Deliver, Archive: A Fast Reference
- Why Start From Raw? Understanding Raw Formats and DNG
- PSD and PSB: When to Keep a Layered Master
- TIFF: The Cross-Application, Lossless Print Standard
- JPEG: Built for Delivery, Not for Editing
- PNG: Right for Graphics, Wrong for Photographs
- WebP, AVIF, and HEIF: The Modern Delivery Layer
- Color Spaces and Bit Depth: Avoiding Banding and Mismatch
- Compression and Save Settings That Actually Matter
- Handling Oversized Files: PSB, Tiling, and Proxies
- What to Keep in Your Archive
- Export Checklist for Web, Print, and Client Delivery
- How 35milimetre Handles Format Decisions on Real Projects
- Why Format Discipline Separates Amateurs From Professionals
- Sources
Capture, Retouch, Deliver, Archive: A Fast Reference
Before you touch a single layer, it helps to see the whole pipeline mapped out. Each stage of a retouching project calls for a different file type, and mixing them up costs you either quality or time you don't get back.
- Capture: Shoot RAW (CR2, NEF, ARW) at 12 to 14-bit. This is your negative. Never edit it directly, always work from a copy.
- Working master: Use PSD inside a Photoshop pipeline for layered, non-destructive retouching. Switch to PSB once your document exceeds PSD's size ceiling, or when you're compositing dozens of layers for a large campaign. If your workflow spans multiple applications outside Adobe, a 16-bit TIFF often serves the same purpose with less lock-in.
- Delivery: Export a fresh JPEG at high quality for client hand-off, or a TIFF if the destination is offset print.
- Archive: Retain the original raw file, a lossless master (DNG or TIFF), and the final flattened deliverable, each labeled and dated.
Color space follows the same logic: edit in Adobe RGB or ProPhoto RGB at 16-bit, then convert to sRGB only at the final export step. Converting early throws away color data you can never recover.
Why Start From Raw? Understanding Raw Formats and DNG
Camera raw files store the sensor's data almost untouched, typically at 12 to 14-bit depth, compared to the 8-bit ceiling of a JPEG straight off the camera. That extra bit depth is what lets you pull back three stops of blown highlights or rebuild color in a shadow that looks black on the back of the camera screen. It's the difference between a negative and a print. Once you flatten to 8-bit, that latitude is gone for good.
Raw files run large, typically 25 to 60MB depending on sensor resolution and whether the camera applies lossless compression. Most manufacturers now offer a compressed raw option that trims file size with no visible quality loss, worth turning on if you're shooting high-volume commercial work and your storage budget is tight.
DNG, Adobe's open raw container, solves a real problem: proprietary raw formats change with every camera generation, and some older ones lose full software support over time. Converting to DNG buys you long-term portability at the cost of a small amount of manufacturer-specific metadata. For working files, shoot native raw. For long-term storage, converting to DNG is worth the extra step.
PSD and PSB: When to Keep a Layered Master
A PSD file holds what a flattened image never can: layers, masks, adjustment layers, and smart objects that let you revise a retouch without redoing it from scratch. That's the entire argument for working in PSD inside a Photoshop pipeline. Smart objects in particular let you swap a background element or update a product shot without rebuilding the composite around it.
The catch is size. Standard PSD tops out well before a heavily layered composite with dozens of smart objects and high-resolution stock elements will land you. That's what PSB, Photoshop's Large Document Format, exists for, supporting documents up to 300,000 pixels on a side. If you're compositing automotive hero shots with a dozen CGI layers, PSB is where you land.
Naming discipline matters more than people admit. A folder full of files named final_v2_ACTUALfinal.psd is a production hazard. Use a consistent convention: client, date, version number, and a short status tag, so anyone on the team can find the current master without opening five files first.
TIFF: The Cross-Application, Lossless Print Standard
TIFF earns its place as the universal handshake between applications. It supports both 8-bit and 16-bit depth, plus device-specific color spaces like CMYK, which makes it the natural handoff point when a file needs to move from Photoshop into a layout program or straight to a commercial press. Choosing between PSD and TIFF often comes down to where the file is headed next: PSD inside an Adobe-only pipeline, TIFF the moment another application enters the chain.
For 16-bit TIFFs, use ZIP compression. LZW, despite being the more familiar option to longtime users, can occasionally inflate 16-bit photographic data rather than shrink it. TIFF supports layers, but strip them before final delivery unless the recipient specifically needs an editable file. A flattened, ZIP-compressed 16-bit TIFF with an embedded ICC profile is the safest print deliverable you can send.
JPEG: Built for Delivery, Not for Editing
JPEG is a delivery format, full stop. Its lossy compression discards data every time the file is saved, so repeated open-edit-save cycles compound quality loss with each pass. Never edit a JPEG directly. Always export a fresh one from your PSD or TIFF master.
Turn on progressive encoding for web images so they render in stages rather than top-to-bottom, which reads as faster loading even when file size is identical. Chroma subsampling (usually 4:2:0 by default) is invisible on most photographic content but can soften fine text or sharp graphic edges, so switch to 4:4:4 if your image includes overlaid typography. Strip unnecessary metadata before sending files externally.
PNG: Right for Graphics, Wrong for Photographs
PNG's real strength is lossless compression paired with an alpha channel, which makes it the correct choice for logos, UI elements, and any compositing element that needs a transparent background. It's the wrong choice for photographic retouching deliverables. A PNG of the same photo runs substantially larger than a comparable JPEG for no visible quality gain, which is dead weight in a client-facing gallery.
PNG technically supports up to 48-bit color and full alpha transparency, but browser handling of 16-bit PNGs is inconsistent, so don't count on that depth surviving intact once it hits the web.
WebP, AVIF, and HEIF: The Modern Delivery Layer
Modern formats close the gap between quality and file size in ways JPEG can't match. WebP typically shrinks files by 25 to 35% versus JPEG at similar visual quality, and AVIF pushes savings even further, at the cost of noticeably slower encoding times, a real consideration if you're batch-processing hundreds of gallery images. HEIF, common on iOS capture, offers strong color depth but limited support outside Apple's ecosystem and select Adobe tools.
Compatibility remains the deciding factor. Older browsers and some legacy Windows image viewers don't render AVIF or WebP at all. The practical fix: keep a JPEG as your delivery master, then generate WebP and AVIF derivatives at build time with JPEG as the fallback. That way every visitor sees an image, and the ones on modern browsers get the smaller file.
Color Spaces and Bit Depth: Avoiding Banding and Mismatch
Edit in Adobe RGB or ProPhoto RGB at 16-bit, and convert to sRGB only when you export for web. This single sequencing decision prevents more color problems than any plug-in you could buy. Practitioners consistently point to 16-bit editing as the way to avoid banding in gradients, especially skies and skin tones, where heavy dodge-and-burn work or color grading would otherwise expose visible tonal steps in 8-bit.
Once your retouch is complete and you're only exporting a final file with no further adjustment planned, dropping to 8-bit for that final JPEG is fine. The damage from 8-bit happens during editing, not at final export.
For print work, embed the ICC profile in every deliverable and soft-proof against the target CMYK profile before sending files to press. Soft proofing in Photoshop shows you exactly which saturated colors will shift or clip on paper, before your client sees a printed proof that doesn't match the screen.
Compression and Save Settings That Actually Matter
Default to ZIP compression for nearly all 16-bit TIFFs. LZW sometimes increases file size on 16-bit photographic data instead of reducing it, which defeats the point of compressing at all.
Inside Photoshop's save dialog, check "Maximize Compatibility" for PSD files so older versions and third-party software can still open them, and preserve layers only when the recipient genuinely needs to edit the file. A flattened export saves both file size and confusion downstream.
Handling Oversized Files: PSB, Tiling, and Proxies
Complex composites, especially stitched panoramas or multi-layer automotive and product renders, can outgrow both PSD and standard TIFF limits fast. PSB, Photoshop's Large Document Format, handles documents up to 300,000 pixels per side, well past what typical formats support.
Linked smart objects and lower-resolution proxies keep memory use and save times manageable while you work, without touching final output quality. For deliverables beyond a single file's practical size, exporting tiled or stitched segments is often more reliable than forcing one document to hold everything, particularly when collaborators run different software versions than yours.
What to Keep in Your Archive
A defensible archive holds three things: the original raw file, untouched, a lossless master in DNG or 16-bit TIFF, and the final flattened deliverable you handed the client. Layered PSDs are useful internally, but most studios don't send them to clients as standard practice, keeping the editable master in-house while the client receives a finished file.
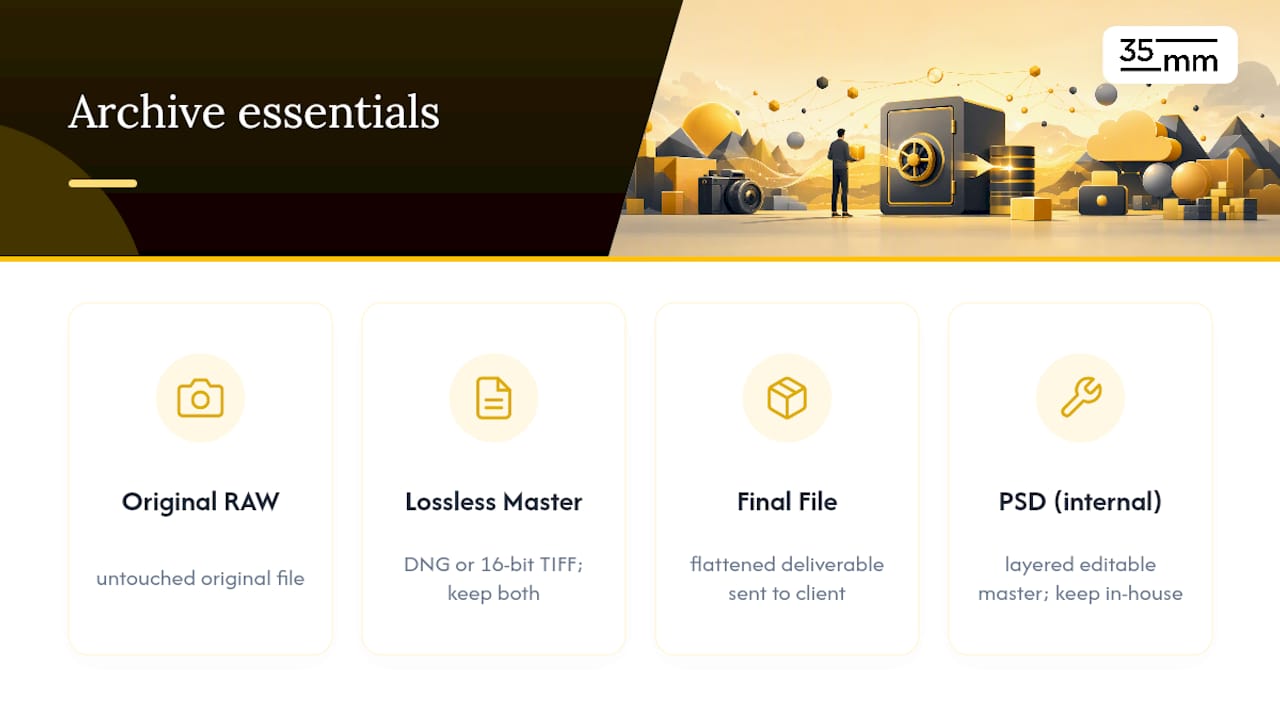
DNG buys portability if a manufacturer's proprietary format falls out of software support down the road; native raw preserves every bit of manufacturer-specific metadata but ties you to continued support for that format. A reasonable middle ground is keeping both.
Run checksums on archived files, store copies in at least two physical or cloud locations, and settle on one folder and filename convention before a project starts, not halfway through it. For more on how these terms fit together across a retouching pipeline, our breakdown of image editing terminology covers the vocabulary in more depth.
Export Checklist for Web, Print, and Client Delivery
- Web: Export JPEG at 80 to 90% quality, sRGB color space, progressive encoding on. Generate WebP and AVIF derivatives for modern browsers.
- Print: Export TIFF or JPEG at 95% or higher, embed the ICC profile, and set the DPI and color space (usually CMYK) the print shop requires.
- Client delivery: Provide a full-resolution flattened deliverable plus a smaller proof file for quick review. Document the color space and resolution in the file name or an accompanying note so nobody has to guess later.
How 35milimetre Handles Format Decisions on Real Projects
On large campaign work, we default to PSB the moment a composite starts stacking CGI elements, retouched photography, and multiple background variants past what standard PSD comfortably holds. Every project keeps a layered master internally; clients receive flattened TIFFs or high-resolution JPEGs, not the working file. When agencies or printers are involved, we confirm their software and color space requirements before the first export, not after a proof comes back wrong. Our guide to professional image manipulation walks through more of this in practice.
Why Format Discipline Separates Amateurs From Professionals
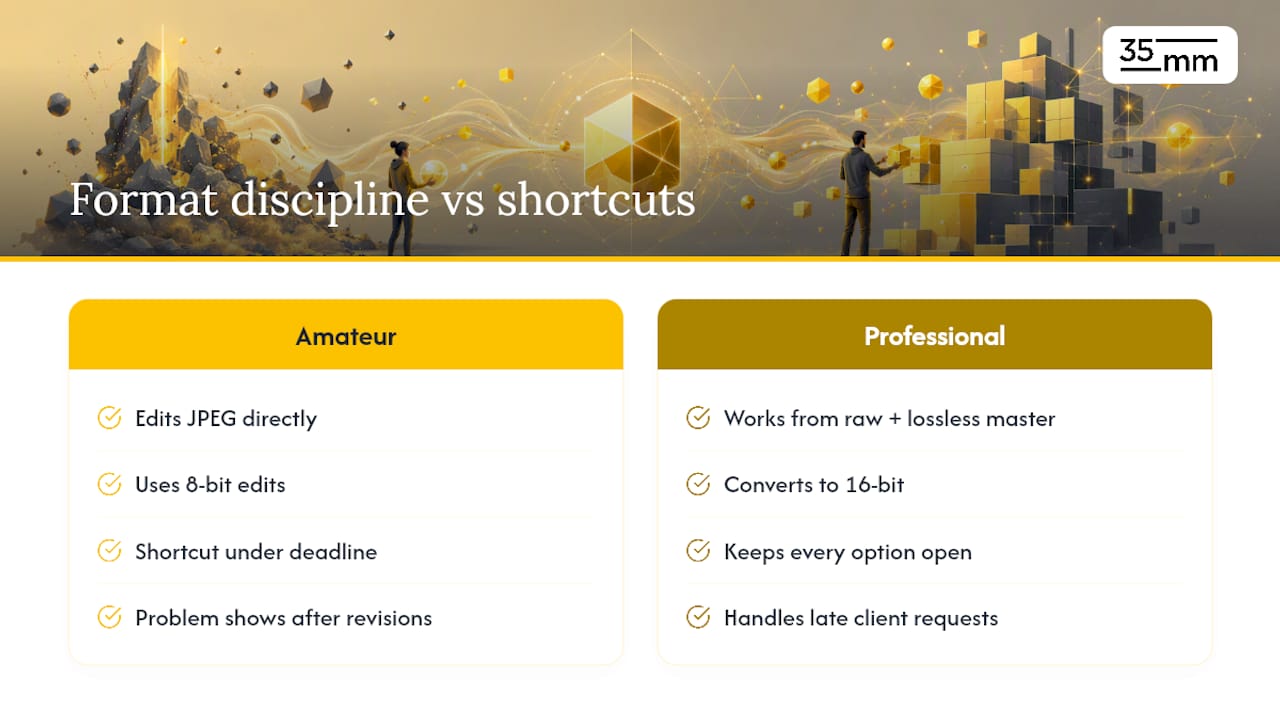
Most format mistakes in retouching aren't about ignorance of what PSD or TIFF stand for. They're about shortcuts under deadline pressure: editing a JPEG directly because reopening the raw feels slow, or skipping the 16-bit conversion because the client "just wants it fast." Those shortcuts don't show up immediately. They show up three revisions later, when the highlight detail that got clipped in an 8-bit edit can't be recovered no matter how skilled the retoucher is.
The format decisions in this guide aren't about chasing technical purity for its own sake. They're about keeping every option open for as long as possible, so a client's late-stage request doesn't force a full redo from scratch. That's the entire argument for archiving raw files and lossless masters even after a project ships: the version you delivered today is rarely the last version anyone asks for. For teams handling campaign volumes with layered composites and tight print deadlines, working with a studio that already has these conventions built into its production pipeline saves the rework nobody budgets for.
— 35mm