
To keep your listing live and your conversion rate healthy, Amazon requires a product-only main image on a pure white background (RGB 255,255,255), a minimum of 1,000 pixels on the longest side to activate zoom, and a file format of JPEG, TIFF, PNG, or non-animated GIF. Supporting images follow considerably looser rules, but the main image is where most suppression happens. Get that one right first.
Non-negotiables to fix right now:
- Main image: product only, pure white background, no text, no watermarks, no props not included in the sale
- Minimum 1,000 px on the longest side to enable Amazon's zoom feature
- Preferred format: JPEG/JPG; PNG and TIFF are accepted; animated GIFs are not
- Color profile: sRGB only — CMYK causes color shifts on Amazon's display engine
- Product should fill roughly 85% of the image frame
- File size must stay under 10 MB per image
Key Takeaways
Amazon's main image compliance and gallery depth together determine whether your listing stays live and whether shoppers convert — getting both right is the single most important image decision you will make as a seller.
| Point | Details |
|---|---|
| Main image non-negotiables | Pure white background (#FFFFFF), product only, no text or watermarks, sRGB color profile. |
| Zoom requires 1,000 px minimum | Images below 1,000 px on the longest side disable Amazon's zoom feature; target 2,000 px. |
| Upload six to nine images | A full gallery of six to nine images consistently outperforms minimal uploads for conversion. |
| Export at 85–95% JPEG quality | This range keeps files sharp at zoom while staying well under the 10 MB per-image limit. |
| 35milimetre for catalog-scale work | The studio delivers retouching, CGI, and A+ assets with built-in QA for Amazon compliance. |
Table of Contents
- What are the exact Amazon product image requirements for 2026?
- What does Amazon require and forbid for the main image?
- How many images should you upload, and in what order?
- How should you export images to stay sharp and under size limits?
- Why does Amazon reject images, and how do you fix them fast?
- 35milimetre's professional post-production checklist
- When should you hire a pro, and when is DIY good enough?
- What 35milimetre offers for Amazon-ready imagery
- Sources
What are the exact Amazon product image requirements for 2026?
The technical floor is straightforward, but the difference between a compliant image and a high-converting one lives in the details above that floor.
Amazon's Sell on Amazon blog states every product listing must have at least one image and recommends images larger than 1,000 pixels on each side to enable zoom. That 1,000 px threshold is the zoom trigger — below it, shoppers cannot magnify your product, which measurably reduces engagement. Most studios now target 2,000 px as the working minimum for retina displays.
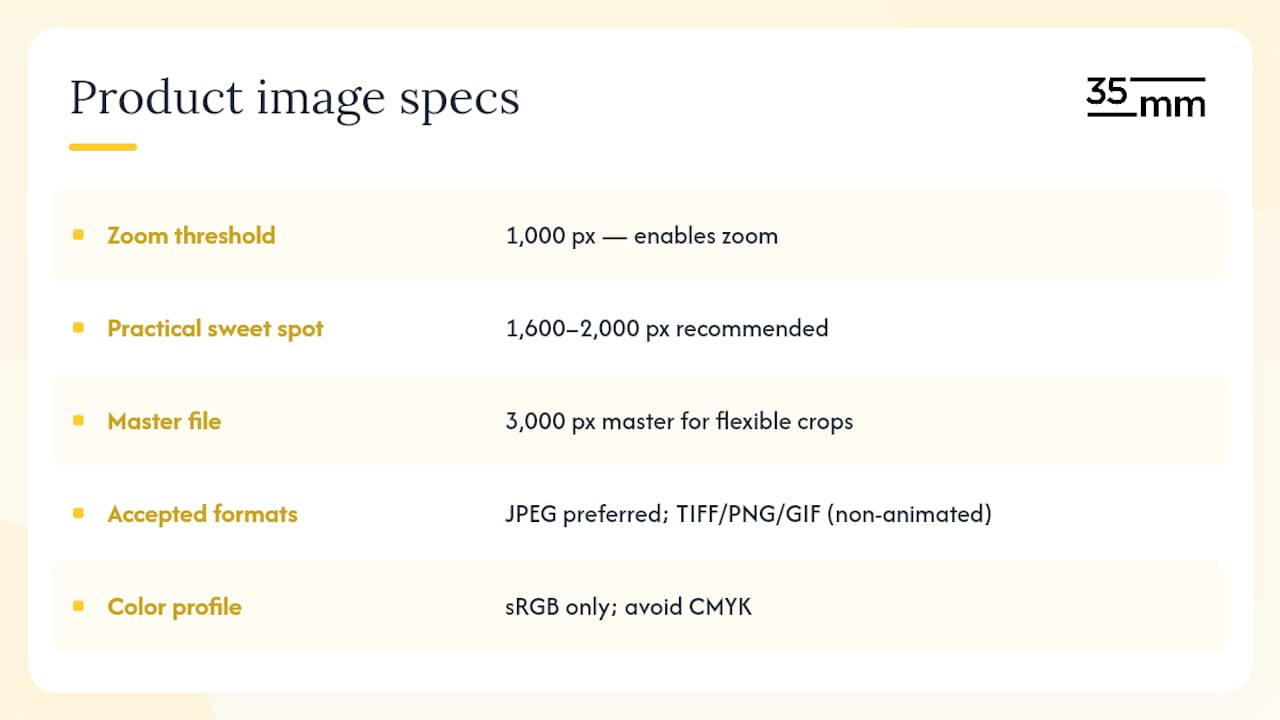
SellerShorts' 2026 spec guide recommends 1,600–2,000 px as the practical sweet spot, balancing file size against display quality. For sellers targeting high-end categories or A+ content modules, a 3,000 px master file gives you room to crop and export at multiple sizes without re-shooting.
Accepted file formats: JPEG/JPG (preferred), TIFF, PNG, non-animated GIF. Amazon's processing pipeline handles all four, but JPEG is the most predictable for color rendering and file size control.
The color profile requirement is one sellers frequently overlook. CMYK is a print-production standard — it does not translate cleanly to screen display, and Amazon's image processor will shift your colors unpredictably. sRGB is the web standard and the only profile Amazon's system renders correctly.
What does Amazon require and forbid for the main image?
The main image is the one still frame standing in for a physical store experience. Amazon treats it accordingly, and its automated checks are strict enough to flag images that look fine to the human eye.
Amazon Seller Central's official image guidelines require the main image to show the product alone against a pure white background. Ngini's 2026 reference specifies that white as hex #FFFFFF — not off-white, not light gray, not a gradient. Amazon's automated system runs corner-white checks and OCR scans on every uploaded image, and even a subtle warm tint in the background can trigger suppression.
Allowed on the main image:
- The product itself, complete and clearly visible
- Multiple units when the listing sells a multi-pack
- Packaging, when the packaging is what the customer receives
Forbidden on the main image:
- Text overlays, logos, watermarks, or badges of any kind
- Props, accessories, or lifestyle elements not included in the sale
- Borders, color backgrounds, or gradient fills
- Illustrated or hand-drawn representations (photographic only, for most categories)
- Mannequins for most apparel (flat lay or ghost mannequin is acceptable in many sub-categories)
The 85% fill guideline from SellerLabs means the product should occupy roughly 85% of the total image canvas. A product floating in a sea of white wastes frame real estate and looks unconvincing at thumbnail size. Crop tightly, but leave a small margin so edges are not clipped.
Category exceptions exist. Apparel has its own set of rules around on-model photography, and some categories permit packaging shots as the main image. Always verify your specific category's requirements in Seller Central before finalizing your main image, because a rule that applies to electronics may not apply to grocery or beauty.
How many images should you upload, and in what order?
Amazon currently allows up to nine images per standard listing (including the main image), and cross-source consensus consistently points to six to nine images as the range that maximizes conversion. Uploading only a few images leaves conversion on the table — shoppers use the gallery to build confidence before buying.
A practical gallery order that works across most categories:
- Main image: Product only, pure white background, 85% fill, 2,000 px minimum
- Hero lifestyle: Product in use or in context, showing the primary use case
- Close-up detail: Texture, material quality, or a key feature shot tight
- Scale/size reference: Product next to a familiar object or with dimensions overlaid
- Infographic/spec shot: Key features called out with clean typography and icons
- Variant image: Color, size, or configuration options shown side by side
- Packaging shot: What arrives in the box, especially for gifting or premium products
- What's in the box: Every included component laid out clearly
- Social proof or certification badge image: Awards, certifications, or brand story (where permitted)
Supporting images are where you have real creative latitude. JungleScout's image requirements guide notes that lifestyle photography, infographics, and even AI-generated illustrations are all acceptable in secondary slots — the strict product-only rule applies to the main image only. This is where you tell the brand story, address objections, and show the product solving a real problem.
For brands enrolled in Amazon Brand Registry, A+ Content (formerly Enhanced Brand Content) adds a separate module below the gallery with richer layouts, comparison charts, and brand narrative sections. A+ modules have their own image dimension specs and are worth planning as part of your overall visual content strategy — the visual content creation guide covers how to approach large image sets efficiently.
How should you export images to stay sharp and under size limits?
Export settings are where technically correct images go wrong. A TIFF exported without sRGB conversion will display with a color cast. Neither will get you suppressed, but both will cost you conversions.
Recommended export settings:
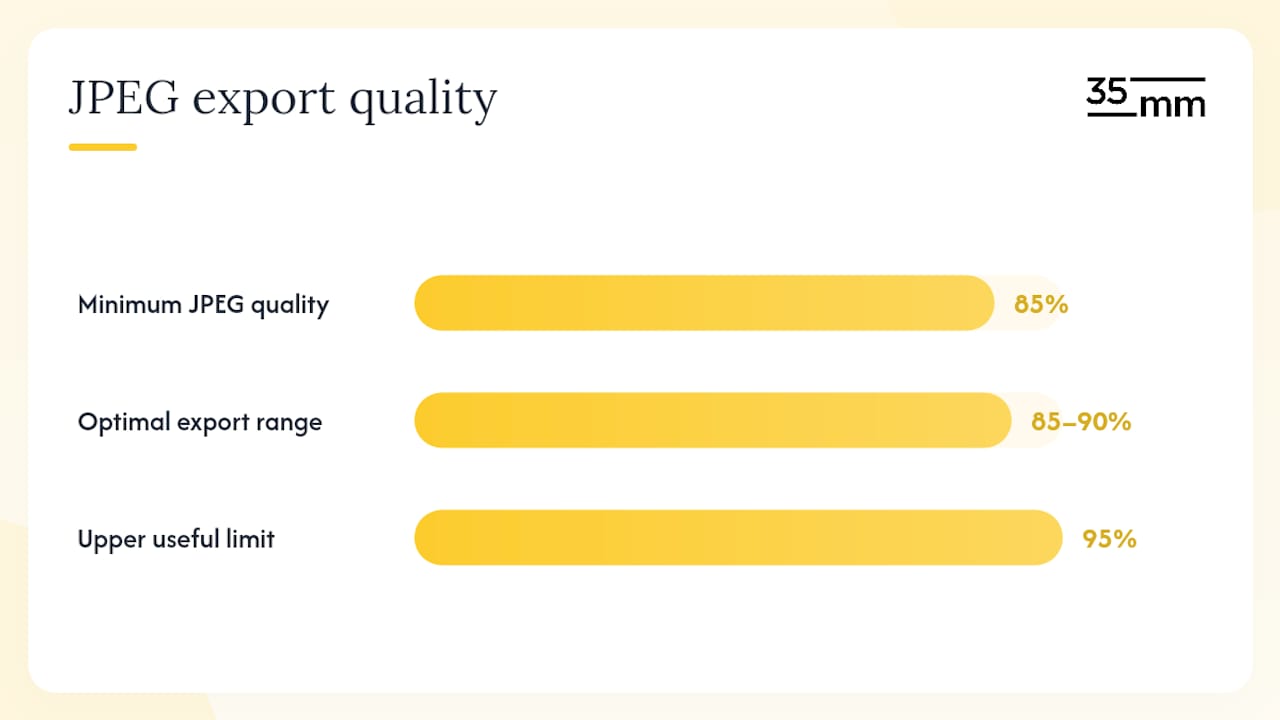
- JPEG quality: 85–95% in Photoshop's Save for Web or equivalent. Below 85%, compression artifacts appear at zoom. Above 95%, file sizes balloon without visible benefit.
- Progressive vs. baseline JPEG: Use baseline for Amazon uploads. Progressive JPEG can cause rendering inconsistencies in Amazon's image pipeline.
- PNG: Use only when transparency is genuinely needed (e.g., a product with a complex silhouette you plan to composite). PNG files are larger and offer no advantage over JPEG for white-background shots.
- TIFF: Acceptable for upload but rarely necessary. Use TIFF as your master archive format, then export JPEG for the actual listing.
- Color profile: Convert to sRGB before export in every tool — Photoshop, Lightroom, Capture One, or Affinity Photo all have a profile conversion step in the export dialog. SellerShorts confirms that CMYK and Adobe RGB profiles are a frequent cause of color shifts on Amazon's display.
For batch exports of variant images, use consistent naming conventions: ASIN_01.jpg for the main image, ASIN_02.jpg through ASIN_09.jpg for supporting images. This maps directly to Amazon's upload order and prevents slot confusion when managing large SKU catalogs.
Pro Tip: Apply output sharpening at the export stage rather than globally in your master file. This preserves the clean master while adding just enough edge definition to compensate for JPEG compression at zoom.
Uploading a larger master at 2,000–3,000 px and exporting a well-compressed JPEG at 85–90% quality tends to produce the best balance between zoom clarity and file-size limits — a workflow that Amazon Seller Central's own guidance supports by recommending high-resolution source files.
For image SEO and discoverability beyond Amazon's own search, the image SEO optimization guide covers technical optimization steps that apply across e-commerce platforms.
Why does Amazon reject images, and how do you fix them fast?
Most suppression events are preventable. The causes cluster around a handful of recurring mistakes, and the fixes rarely require a full re-shoot.
| Problem | Quick fix |
|---|---|
| Off-white or tinted background | Re-export with background set to #FFFFFF; use Levels or Curves to neutralize any warm/cool cast |
| Text or watermark on main image | Remove in post-production; re-export clean |
| Image below 1,000 px on longest side | Upscale to 2,000 px using AI upscaling (Topaz Gigapixel, Adobe Firefly upscale) then re-export |
| Wrong color profile (CMYK/Adobe RGB) | Convert to sRGB in Photoshop (Edit > Convert to Profile) before export |
| Product fill below threshold | Crop canvas tighter; aim for 85% fill, leaving a small margin |
| Props or accessories not in sale | Remove in post-production or re-shoot without them |
| Placeholder or test image | Replace with final product image before activating the listing |
When a listing is suppressed, Amazon typically sends a notification in Seller Central with a reason code. Check the Manage Inventory page for a yellow warning triangle — clicking it reveals the specific violation. Fix the image, re-upload, and the listing usually reactivates within a few hours. If the suppression persists after a correct re-upload, contact Seller Support with the ASIN and the corrected image file.
A fast pre-upload QA process prevents most of these issues. Run the file through a free OCR tool to confirm no text is embedded. Verify the pixel dimensions in your file browser or image editor. This three-step check takes under two minutes and catches the majority of rejection causes before Amazon's automated system does.
- Open the exported JPEG at 100% zoom and inspect all four corners for any non-white pixels
- Check file dimensions in your OS file info panel or image editor
- Verify the color profile is sRGB in Photoshop (Image > Mode or File Info)
- Run a quick OCR scan if the image went through any automated processing
- Upload to Seller Central and use the image preview to confirm rendering before activating
35milimetre's professional post-production checklist
Studio-level image preparation goes beyond compliance. The goal is an image that passes Amazon's automated checks on the first upload and performs well in the gallery. Here is the checklist we apply at 35milimetre before any Amazon-bound image leaves our workflow.
- Master file: Save a layered PSD or TIFF master at full resolution before any destructive edits
- Color conversion: Convert from Adobe RGB or CMYK to sRGB as the first step, not the last
- Background cleanup: Flood-fill the background to #FFFFFF and use a layer mask to clean product edges — avoid the magic wand for complex silhouettes
- Edge refinement: Remove halo artifacts, fringing, and semi-transparent pixels along the product edge using Refine Edge or Select and Mask
- Perspective correction: Straighten the product so it sits naturally in the frame — tilted products look unprofessional at thumbnail size
- Shadow and reflection: Add a subtle drop shadow or ground reflection to anchor the product visually; keep it realistic and proportional
- Lighting consistency: Match the light direction and color temperature across all variant images so the gallery reads as a cohesive set
- Product fill check: Measure the product's bounding box against the canvas — it should occupy roughly 85% of the frame
- Export QA: Export at 2,000 px JPEG 90%, then open the exported file (not the master) to confirm sharpness and color
Pro Tip: For multi-material products — say, a stainless steel bottle with a matte rubber grip — apply local sharpening separately to each material zone. Metal benefits from slightly higher radius sharpening; soft materials look better with lower radius and higher amount. A single global sharpening pass rarely serves both surfaces well.
On AI-generated and CGI imagery: supporting images are a legitimate place for 3D renders and AI-assisted composites, and they can be produced faster and at lower cost than on-location lifestyle photography. The main image is a different matter. Amazon's guidelines require the main image to be photographic and accurate — an AI-generated main image that misrepresents the product's color, size, or materials creates both a compliance risk and a return-rate problem. Use AI and CGI in secondary slots to tell the story; use a clean, accurate photograph for the main image. The product image enhancement guide covers how retouching and compositing can work together without crossing into deceptive territory.
When should you hire a pro, and when is DIY good enough?
The honest answer depends on four variables: SKU count, product complexity, brand positioning, and how much your conversion rate is worth per percentage point.
DIY is a reasonable starting point when you have fewer than ten SKUs, a simple product with a clean silhouette, and a main image that already meets the technical floor. In that scenario, a lightbox, a smartphone with a 12 MP+ camera, and a basic editing tool like Adobe Lightroom or Canva can get you to compliance. Prioritize the main image first — get that right, then add three to four supporting images. That minimum viable gallery will outperform a single compliant image every time.
The calculus shifts when products have complex geometry, reflective surfaces, multiple materials, or when the brand is competing in a crowded category where thumbnail differentiation matters. A stainless steel appliance, a multi-component skincare set, or a piece of furniture with wood grain and metal hardware — these are products where amateur lighting and basic retouching show immediately. Shoppers notice, even if they cannot articulate why.
Consider a professional studio when any of these apply:
- You are managing 20 or more SKUs and need consistency across the entire catalog
- The product has reflective, transparent, or multi-material surfaces
- You need CGI or 3D renders for colorways that do not yet exist physically
- Your A+ Content modules require custom-designed image assets
- You are launching in a category where top competitors have clearly invested in professional imagery
- Seasonal catalog updates happen frequently enough that in-house production creates a bottleneck
For brands building long-term on Amazon, investing in product visuals that genuinely represent the product's quality is one of the highest-return decisions you can make. A suppressed listing costs you every day it is down. A low-quality image costs you every day it is up.
What 35milimetre offers for Amazon-ready imagery
35milimetre's post-production and design services are built for exactly the kind of work Amazon demands: technically precise, brand-consistent, and ready to upload without a second round of fixes.
The studio handles commercial retouching for white-background main images, variant image sets with consistent lighting across every colorway, CGI and 3D rendering for products that need non-photographic supporting imagery, and full A+ Content asset production. Every deliverable goes through the QA checklist described above before it leaves the studio — corner-white checks, sRGB verification, pixel dimension confirmation, and a final OCR pass to catch any embedded text.
Turnaround for a standard SKU set (main image plus six supporting images) is typically five to seven business days. For larger catalogs or time-sensitive launches, 35milimetre can scale the team and prioritize accordingly. If you are unsure whether your existing images will pass Amazon's automated checks, a pre-upload QA review is a good first step. Contact 35milimetre to discuss your catalog and get a quote.
Sources
The official source for all Amazon product image requirements is Amazon Seller Central's image guidelines — that page is the authoritative reference and should be your first stop whenever a rule seems ambiguous or a category-specific exception applies. Amazon updates these guidelines periodically, so checking Seller Central directly before a major catalog launch is worth the two minutes it takes.
For practical workflow guidance, Amazon's Sell on Amazon blog covers photo best practices in plain language and is updated by Amazon's own team. Third-party guides from SellerLabs and JungleScout are useful for workflow tips, gallery ordering advice, and suppression troubleshooting — treat them as tactical supplements to the official policy, not replacements for it. The SellerShorts 2026 spec guide and Ngini's complete reference are both well-organized for quick spec lookups and suppression diagnostics.
- Amazon
- How to take product photos in 2025 | Sell on Amazon - Sell on Amazon
- Amazon Product Image Requirements 2026: Full Spec Guide | SellerShorts Blog
- Amazon Product Image Requirements 2026: Full Spec Guide - Seller Labs: Amazon Seller Software and Platform
- Amazon Product Images Requirements & Best Practices
- Amazon Image Requirements 2026: Main + Additional + A+ (Complete Reference) | ngini