
3D visualization is the process of creating three-dimensional digital representations of objects, spaces, or concepts to communicate design intent with clarity and impact. It sits above rendering in the production chain: visualization covers the full process, while rendering is the final step that converts 3D scene data into a 2D image or animation by simulating light and camera behavior. For designers and artists, mastering this discipline means the difference between a concept that gets approved and one that gets misread. This 3D visualization guide covers the tools, workflows, rendering choices, and visual techniques that produce professional results across advertising, product design, and digital media.
What essential tools do you need for 3D visualization?
The right software defines the ceiling of your work. Blender is the most accessible starting point: it is free, open source, and capable of production-grade modeling, shading, and rendering through its Cycles and EEVEE engines. Autodesk 3ds Max remains the industry standard for architectural visualization and product rendering, with a mature modifier stack and tight integration with V-Ray. Autodesk Maya dominates character animation and VFX pipelines at studios like ILM and Weta. Adobe Substance 3D handles material creation and texturing with a physically based rendering workflow that feeds directly into any major renderer.
Hardware matters as much as software. A GPU with at least 8GB of VRAM accelerates real-time viewport feedback and GPU rendering in Blender Cycles or Redshift. An NVMe SSD reduces scene load times and texture streaming bottlenecks. For complex scenes with millions of polygons, 32GB of RAM is the practical floor.

| Software | Primary Use | Rendering Engine | Cost |
|---|---|---|---|
| Blender | Modeling, animation, VFX | Cycles, EEVEE | Free |
| Autodesk 3ds Max | Arch-viz, product rendering | V-Ray, Arnold | Subscription |
| Autodesk Maya | Character animation, VFX | Arnold | Subscription |
| Adobe Substance 3D | Texturing, materials | Integrated PBR | Subscription |
Pro Tip: Mastering keyboard shortcuts and workspace customization can reduce your total modeling time by 30–50%. Spend one focused session remapping your most-used commands before starting any production project.
How do you build a structured 3D visualization workflow?
A structured workflow is the single biggest factor separating fast, professional output from slow, revision-heavy projects. Each render must serve a functional goal such as client approval, marketing, or technical verification. That goal determines your detail level, polygon budget, and final format before you touch a single vertex.
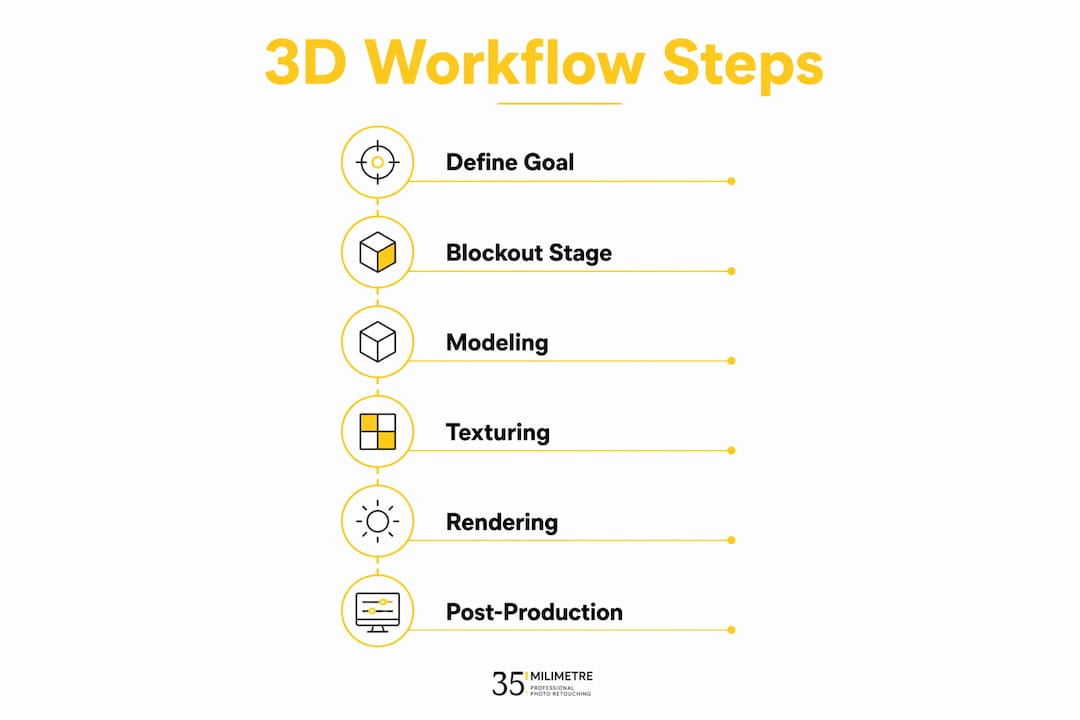
A reliable production sequence looks like this:
- Define the goal. Decide whether the output is for client presentation, e-commerce, print, or real-time use. This single decision shapes every choice downstream.
- Gather references. Collect photo references, mood boards, and technical drawings. Reference eliminates guesswork and anchors your proportions to reality.
- Build the blockout. Use primitive shapes to establish silhouette, scale, and spatial relationships. The blockout phase can prevent up to 50% of wasted production time by locking structure before detail work begins.
- Confirm scale and camera. Set your camera angle and focal length early. Changing the camera late in production often reveals proportion problems that require rebuilding.
- Add detail and materials. Refine geometry, apply UV maps, and build materials in Substance 3D or your renderer's shader graph.
- Render and composite. Output render passes separately (beauty, shadow, reflection, ambient occlusion) and composite in Adobe Photoshop or After Effects for maximum control.
Non-destructive workflows using modifiers allow infinite iteration without rebuilding geometry from scratch. Bevel and subdivision modifiers in Blender, or the modifier stack in 3ds Max, preserve your base mesh while letting you adjust edge sharpness or polygon density at any point. This is not optional for professional work. Client changes arrive after you think the project is done, and a non-destructive setup means those changes take minutes instead of hours.
Focusing on the end use of the model is the most common mistake designers skip. An interactive web model needs a low polygon count and optimized topology. A cinematic product render needs dense geometry and high-resolution textures. Conflating these goals early causes project delays that no amount of skill can recover.
Pro Tip: Run a topology cleanup pass before you start adding materials. Ngons and overlapping geometry cause shading artifacts that are invisible in the viewport but obvious in the final render.
Which rendering techniques should you choose for different projects?
Rendering technique selection is a project decision, not a personal preference. Ray tracing delivers photorealism by simulating how light physically bounces between surfaces, making it the right choice for product visualization, automotive CGI, and architectural stills. Rasterization processes geometry mathematically rather than physically, producing results faster but with less accurate reflections and shadows. It powers real-time applications like design review tools and game engines such as Unreal Engine.
Real-time rendering in Unreal Engine or Blender EEVEE suits interactive presentations, VR walkthroughs, and motion graphics where frame rate matters. Offline rendering in V-Ray, Arnold, or Blender Cycles suits final-output stills and animations where render time is acceptable in exchange for physical accuracy. Global illumination and shadow rendering add visual depth that separates a professional result from a flat, unconvincing one.
| Technique | Speed | Realism | Best Use Case |
|---|---|---|---|
| Ray tracing | Slow | Very high | Product renders, arch-viz stills |
| Rasterization | Fast | Moderate | Real-time previews, games |
| Scanline rendering | Very fast | Low | Drafts, quick client previews |
| Path tracing | Slowest | Highest | Cinematic VFX, hero shots |
Photorealistic and stylized approaches serve different communication goals. Photorealism builds trust in product and architectural contexts because it reads as a photograph. Stylized rendering, using cel shading or flat color palettes, works better for explainer content, brand illustration, and motion graphics where clarity beats realism. Choosing the wrong style for the context confuses the audience before they read a single word of copy.
What visualization techniques create the most impact?
Lighting is the most powerful tool in your kit, and most designers underuse it. Three-point lighting (key, fill, and rim) gives any object readable form and depth. HDRI environment maps in Blender or 3ds Max add physically accurate ambient light that integrates CGI with photographic backgrounds convincingly. For product visualization, a single large area light with a subtle rim light often outperforms complex multi-light setups because it reads cleanly at small sizes.
Material quality separates amateur renders from professional ones. Physically based rendering (PBR) materials use real-world values for roughness, metalness, and reflectivity. Substance 3D ships with a library of calibrated PBR materials that match real surfaces. Using a plastic shader with a roughness value of 0.8 and a metalness of 0.0 is more accurate than manually tweaking specular highlights by eye.
Composition follows the same rules as photography and cinematography. The rule of thirds, leading lines, and negative space all apply directly to 3D scene layout. Place your hero object at a compositional intersection, not dead center, unless symmetry is the deliberate message. For animated visualizations, move objects in staged steps rather than simultaneously. Simultaneous movement overwhelms viewers and reduces comprehension, based on analysis of 40 real-world animation examples.
- Use HDRI lighting for natural ambient integration in product and arch-viz scenes.
- Apply PBR materials with calibrated roughness and metalness values, not manual specular tweaks.
- Compose with the rule of thirds and use negative space to direct viewer attention.
- Stage animated movements sequentially to respect perceptual tracking limits.
- Design for the final output medium: web thumbnails need different contrast than large-format print.
Pro Tip: Before you render at full resolution, do a small-scale test render at 25% size. Check lighting, material response, and composition at that scale. Most composition problems are visible at low resolution and invisible when you are zoomed into detail work.
Key takeaways
A structured 3D visualization workflow, built on clear goal definition, blockout discipline, and non-destructive editing, produces faster results and fewer revisions than any software upgrade.
| Point | Details |
|---|---|
| Define the goal first | Every render decision flows from whether the output is for marketing, approval, or real-time use. |
| Blockout before detailing | Locking silhouette and proportions early prevents up to 50% of wasted production time. |
| Use non-destructive editing | Modifier-based workflows let you handle client changes without rebuilding geometry. |
| Match rendering technique to purpose | Ray tracing suits final stills; rasterization suits real-time and interactive output. |
| Design for the output medium | Web, VR, and print each require different topology, resolution, and composition choices. |
What we have learned from two decades of 3D visualization work
The most expensive mistake we see designers make is treating 3D visualization as a purely aesthetic exercise. A render that looks stunning but fails to communicate the right message to the right audience has done nothing. At 35milimetre, we start every project by asking what decision this visual needs to support. That question changes everything: the camera angle, the lighting mood, the level of surface detail, and even the rendering engine we choose.
The blockout stage is where most time is saved or lost. We have seen talented artists spend days on surface detail only to discover the proportions were wrong from the start. Locking the silhouette with primitive shapes before touching a subdivision modifier is not a beginner technique. It is what professionals do to protect their time. The same discipline applies to building efficient ad agency workflows where revision cycles are compressed and client feedback is constant.
Speed and quality are not opposites. They are the product of good habits. Non-destructive editing, keyboard shortcut fluency, and a clean reference library all reduce the friction between your idea and the final output. The artists who produce the best work fastest are not the ones with the most powerful hardware. They are the ones who have built systems that remove decision fatigue from the production process. That is the real lesson from 3D design best practices that holds across every project type we handle.
— 35milimetre
Professional post-production that takes your renders further
Raw renders are a starting point, not a finished product. At 35milimetre, we work with designers and artists to push final outputs beyond what the renderer alone can deliver.
Color grading, compositing, retouching, and CGI integration are what separate a technically correct render from a visual that stops people mid-scroll. Our team has spent over two decades refining these techniques for major technology and automotive brands. Whether you need a single hero shot polished for a campaign or a full batch of marketplace-ready product visuals, we handle the post-production layer that makes the difference between good and genuinely outstanding. Reach out to see what professional retouching and visual post-production can do for your next project.
FAQ
What is the difference between 3D visualization and 3D rendering?
3D visualization is the full process of creating and presenting three-dimensional content, while rendering is the final step that converts scene data into a 2D image by simulating light. Rendering is one part of the broader visualization workflow.
Which software is best for beginners starting 3D visualization?
Blender is the best starting point for most designers. It is free, covers modeling, shading, and rendering, and has a large community with extensive learning resources.
How long does a professional 3D visualization project take?
Timeline depends on complexity and output type. A single product render typically takes one to three days from blockout to final composite, while a full architectural visualization sequence can take several weeks.
What is the blockout stage and why does it matter?
The blockout stage uses primitive shapes to establish proportions and silhouette before any detail work begins. Completing it correctly can prevent up to 50% of wasted production time caused by structural revisions later.
When should you use ray tracing vs. rasterization?
Use ray tracing for final-output stills and animations where photorealism is required. Use rasterization for real-time applications, interactive presentations, and design reviews where speed matters more than physical accuracy.